top of page


HOLE-BY-HOLE

Hole 1 - Par 4
A straight, narrow par 4 with trees tight on the left and a bunker guarding the front-right of the green. Position off the tee matters more than distance to set up a clean approach.

Hole 3 - Par 3
A short par 3 framed by trees with a narrow entrance to the green. Accuracy off the tee is everything, as anything offline gets punished quickly.

Hole 5 - Par 3
A tight par 3 with bunkers flanking the green and trees closing in. Club selection is critical to avoid short-sided misses.

Hole 7 - Par 4
A shorter par 4 with water cutting across near the green. The approach is tricky, requiring distance control to avoid the hazard and bunkers.

Hole 9 - Par 4
A longer par 4 with a split fairway feel and trouble near the landing zones. Choosing the right side sets up a much easier approach to the green.

Hole 11 - Par 4
A narrow par 4 with trees lining both sides and a bunker near the fairway. Staying straight off the tee is essential to avoid scrambling early.
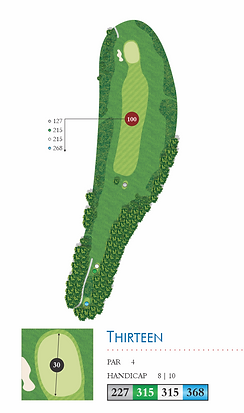
Hole 13 - Par 4
A medium-length par 4 with a slightly offset fairway and a protected green. A controlled drive sets up a straightforward but still demanding approach.

Hole 2 - Par 5
A long par 5 that bends left with water lurking along the fairway and near the green. Smart players lay up short of trouble and attack the green from the right angle.

Hole 4 - Par 4
A slightly doglegging par 4 with dense trees left and scattered trouble right. The green is protected by bunkers, so approach shots need to be controlled and precise.

Hole 6 - Par 4
A demanding par 4 with bunkers mid-fairway and near the green. A well-placed drive opens up a manageable second into a guarded putting surface.

Hole 8 - Par 4
A straight par 4 with water in play off the tee . Conservative positioning pays off to keep the ball in play.

Hole 10 - Par 5
A challenging par 5 with water crossing the fairway near the green. It’s a three-shot hole for most, with careful placement needed on every shot.
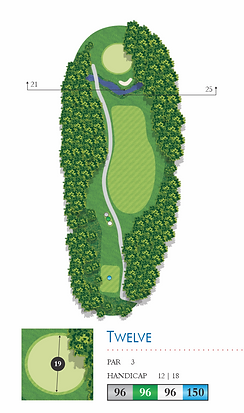
Hole 12 - Par 3
A short par 3 with water guarding the front of the green. It looks simple, but any mis-hit brings big numbers into play.

Hole 14 - Par 4
A long, tightening par 4 with trouble pinching in along the fairway. The green is small, rewarding a well-struck and accurate second shot.

Hole 15 - Par 5
The course’s signature hole, a par 5 highlighted by its striking island green. It’s a true risk-reward challenge where smart positioning sets up your approach, but anything off line brings water into play.

Hole 16 - Par 4
A par 4 with water running alongside the fairway and near the tee. Precision off the tee gives you a chance to attack the long, undulating green safely.

Hole 17 - Par 3
A short par 3 with a simple layout but a narrow green. Distance control is crucial to avoid missing long or short into trouble.

Hole 18 - Par 5
A sweeping par 5 with a winding fairway. The hole finishes on a large, two-tiered green, making it a true risk-reward closer where aggressive play can pay off—or unravel quickly.
bottom of page